43221 Queen Elizabeth Sixth Form College

.

Friday, 29 March 2013

Production Update: Week 4 (Front Cover)

In my final week I did the finishing touches on my front cover so that it ws up to a proffessional stamdard and quality. The changes I made were that I made the masthead stretch across the whole of the magazine so that it would stand out more. I also changed the placing and the style of the price sign.
Next I changed the placing of the sell lines so that it was either aligned left or right depending on which side it is placed. I also rearranged the sell lines so that my main sell line was directly next to the model's head making it clear to the audience which is the main story included in the product.
I again re-arranged the sell lines so that those on the right were moved up slightly and more spaced out so that it did not look as empty and all of the sell lines could be easily seen.
I then however, moved the sell lines on the left down slightly and moved the price down aswell, which still ensured that it was not too spaced out but it also meant that the masthead could be fully seen and read easily by the audience. 
This was my final product in relation to the front cover. 


Production Update Week 4 (DPS)

This was the final week that I had to complete my production and so as I had done the main aspects of my double page spread I now was working on making the final touches, gaining feedback and making any ammendments that I felt were neccessary. Those who gave me feedback and I, thought that there was a lot of empty white space around the content and so I needed to find a way to add more colour and re-arrange the content so that it filled up more space. Therefore I placed some of the text inside of transparant coloured boxes. I kept with the colour-scheme and choose a lighter and darker shade of pink. I used the lighter box to be placed behind the kicker and the darker box was placed behind the breakout box. I decided not to place the introductory paragraph into a coloured box as I wanted to show that it was a different section to the kicker and that it was where the paragraph started. I also added page numbers to the bottom and boxes in the top corners which tell the reader what section of the magazine they are in.


Although the issue had been improved there was still a relatively large amount of white space that needed filling. In order to solve this problem I decided to add another image and make some of the other content larger so that it would fit in the page much better. I also re-arranged some of the text so that it looked more in line and neat. The image I added in was a bottle which I made into a silhouette and then added in devil ears and a tail. This was symbolic of the danger and 'devilish' ways that bottle can act and make you act.

I thought that the white spaces were filled a lot more compared to previously, however I now thought that the boxes looked a bit too harsh. I wanted my article to be a calm and easy to read article because I did not want the topic to come across as boring. Therefore I needed to make sure that it did not look like it was going to be hard to read. In order to solve this I made a small adjustment and made the boxes have rounded edges. Although this was only a small change I think it did help to transform the feel of the magazine to a less serious tone. I also re-arranged the writing and image in the bottom left hand corner because I thought it would look better being split up from the image of the bottle. I also changed the border on the breakout box as I thought that it was slightly easier on the eye to for it to be against the white instead of the pink. It also helped to fill up some more of the white space.

This was the final product that I made in relation to the double-page spread.

Friday, 22 March 2013

Production Update Week 3 (DPS)

In the middle of the week I began my double page spread and began to manipulate the images that I was going to use in the DPS.  The images that I manipulated can be seen below.


I wanted to have a clear white background to the image as I thought that it would fit in with the background of my DPS better.Therefore I had to touch up some of the area's that had shadows or were slightly discoulered.


I then began to create my double page spread. I began with the header so that I could figure out where I wanted everything to be placed in relation to this. As I wanted my article to be in sections inside of boxes I had to create these boxes and write my article in to the boxes. I also began to add the images into the double page spread so I could see how these were going to fit with the rest of the article.


I continued placing the boxes in and played around with where I would place them on the page so that they looked good but were also in a order that made sense. I also continued to place the images in and play around with where they would all be placed. I also added the summary paragraph of my article as well as the kicker and introduction. Now that I had all of the main pieces onto my page I knew that I would be able to play about with where they were going to be placed.

This was the first placing I tried. However, I thought that it looked a bit too messy and jumbled up. There was no clear order to it and therefore I knew that this would make it difficult to read for my target audience and this was not something that I wanted for my article.


I then tried this arrangement. I preffered it to my first attempt however I did not think that this was still the perfect arrangement. The boxes still looked out of place. However, I did like the placing of the images and therefore I kept these images in a similair place to these. I also added my breakout box to the bottom corner, which includes contact numbers and websites my target audience can look at or speak to in order to get help on the topic I am discussing in my article.


At the end of the week, I had this arrangement. I very much preffered the straight boxes that were all in line. I thought it looked more proffessional and would ensure that it was easy to read and understand for my target audience. However, I do think that there is still quite a bit of white spacing and so there is some re-arranging and adding that I need to do. For example, I wish to place some of the text inside of a coloured box to make it stand out more and to brighten the page up slightly.


Friday, 15 March 2013

Production Update Week 2

This week I did some final touches to my front cover that I thought would improve the overall look of the cover. I wanted to do the final touches and then begin my double page spread to ensure that I would have time at the end to go back over both products and make very final adjustments.


At the beginning of the week I did my front cover. I thought that there were too many blank spaces around the cover and therefore to solve this I added an extra sell line. I think this filled up the cover well and ensured that there were no empty spaces around. I did not face any problems whilst doing this as it was using the same skills as I had done last week.


A problem that arose with my front cover was that the sell lines did not stand out well enough and this meant that some of them could not be read easily. This is especially an issue with my main sell line as it slightly covers up some of the image. This made it particularly difficult to read. In order to solve this problem I placed some effects upon the text to make it stand out. The effects that I used were the bevel and emboss and the drop shadow effects. This was very useful to me as I had previously not used this tool and so this ensured that I was making progress with my skills on Photoshop. This could also help me in the future if I need any other text to stand out.


The last final touch I made to the front cover before moving on to my double page spread was the price. I thought that it previously looked unproffessional and did not really look like it had a definite place on the front cover. To solve this I placed it into the very corner of the front cover so that it was not a fully formed circle. I think this look much more proffessional and had more of a likeness to real life products.


Tuesday, 12 March 2013

Production Update Week 1

This week I started my production and have began to make improvements within the product. I have began with my front cover. I have looked at my flat plan to see what I designed and then placed these plans into Photoshop. When this was done I looked at the aspects that were good, and what needed changing. I have also made some changes whilst creating it.

The first job I had to do was setting up my page sizes and then inserting my cover image into this document. I did not face any problems whilst doing this and so this was a relatively easy first step. I also had to place my guides into the document so that everything would look neat and match up together.

Next, I decided to begin adding the sell lines and the heading of the image. I firstly did the heading and the price. There were no problems doing the heading, but I did have some difficulty with the price sign. This was because the writing in it could not be changed when I wanted it to, therefore to solve this I found out that I needed to click on the text icon before I could actually change the writing. This knowledge will also help me in the future for when I am wanting to change the text. Other than this issue, that was quickly resolved, I did not face any problems up until this point.

I then continued to add the sell lines on to the front cover. I experimented with different 3 colour pallettes and this was the one that I am going with for now. Although this may change in the future, I think that the colours do work together and stand out on the cover well. They are also quite girly colours which relates back to my target audience of 16-19 year old females. I decided to change the heading colour from the blue to black because I thought that this stood out more. The sell lines I used aim to entice the readers to buy the products, this means that I have used a lot of exclusivity lines and involved them in a lot of them by using 'you' a lot. I did not face any problems doing this as it was very similair to previous tasks I have completed.
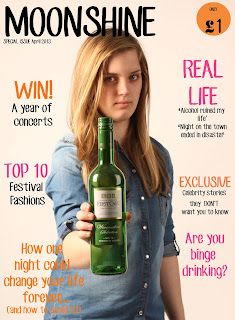

The final task that I completed this week was changing the fonts of the sell lines of my front cover. When I first placed the sell lines in, I just wanted to get a feel of where everything was going to be placed on the cover. Therefore now I have decided where abouts they will be placed I can now change the fonts to those that I have downloaded.

Next week, I plan to continue and hopefully complete my front cover. I need to manipulate the image of the bottle so that the label reads 'Your future is in the bottle' and I will need to change the fonts so that they stand out more, as it is difficult to read some of the sell lines. I also think that some of the gaps need to be filled in. These are the tasks I am planning to complete next week.